macpro build - day 3
August 29, 2020
Day three, fittingly enough, is all about Thunderbolt 3. This was really the key to the whole project; getting Thunderbolt 3 working meant I could easily swap between my work computer and my personal computer. I could use the same peripherals and configuration (no moving monitors around or swapping input devices - just one thunderbolt cable). Ultimately, I was able to get everything sorted such that my Caldigit TS3 Plus and LG 5k Ultrafine work perfectly on warm boot (ie - they are not recognized as thunderbolt devices when the Mac Pro first powers on from a shutdown state, but after being logged in to a user and rebooted, they work just fine). This includes hot plugging (hugely important for me, seeing as I move a Thunderbolt cable from my work machine to my Mac Pro. If I had to reboot two or three times in between each of those, it would be incredibly annoying. In fact, it would be tempting to just leave my work computer set up. And if my work computer is set up, I may as well do a little more work…and that’s how I would end up working far too late. The dangers of working from home!), brightness/webcam/speakers/mic/rear USB C ports on the LG 5k and all ports on the Caldigit. So what was the process?
the card #
The Gigabyte GC-Titan Ridge PCIe card has two Thunderbolt 3-out ports, and two DisplayPort-in ports (as I understand it, a single DisplayPort 1.2 cable cannot carry 5k pixels; internally, the 5k iMac had to combine two DisplayPort streams over a custom interconnect. I think that’s also what spelled the end for Target Display Mode, but that’s more than a bit of a digression). To make it work in the 5,1 Mac Pro requires some finagling in three areas: power, firmware and drivers. This process is captured very nicely in some great writeups, and exhaustive forum posts, but there are a few pitfalls that I’ll point out along the way here.
power #
Powering the Gigabyte GC-Titan Ridge card is pretty straightforward. By design,
the included THB_C Header Cable would connect to the matching headers on a
Gigabyte Thunderbolt motherboard. Clearly, we don’t have those on the 5,1.
Instead, I jumped the third and fifth pins with a small piece of wire.
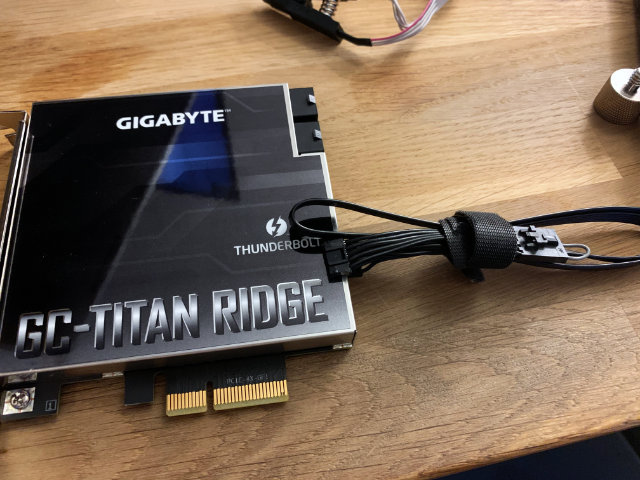
Figure 1: The small grey wire on the right jumps the third and fifth pin
firmware #
This process is a bit more involved. Ultimately, we’ll be using an EEPROM USB Programmer to get some custom firmware flashed onto the Titan Ridge. Reviewing the manual for your particular USB Programmer is important - the one that I purchased has a single identifying lead (one red wire) letting you know which is the first pin of the chip.
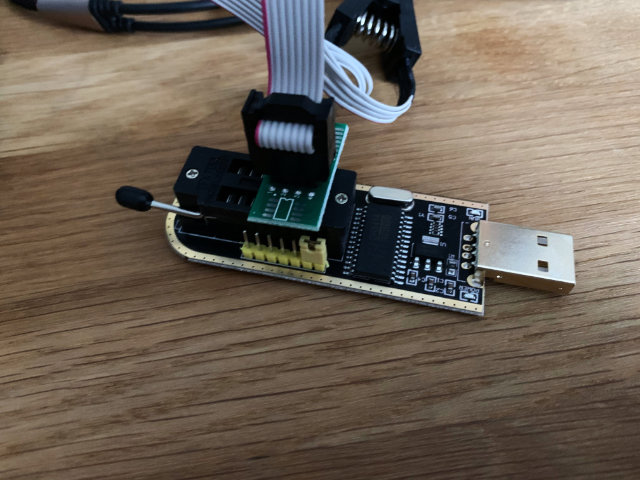
Figure 2: Note the red wire matching up with the 1 lead
I took the housing off of the Titan Ridge card, and clipped the programmer into position.
To orient yourself on the Titan Ridge card, keep the thunderbolt ports as close to you as possible, with the PCIe male interface on your right. The matching first PIN on the chip is the bottom right on both the Blue and Green chips in this orientation.
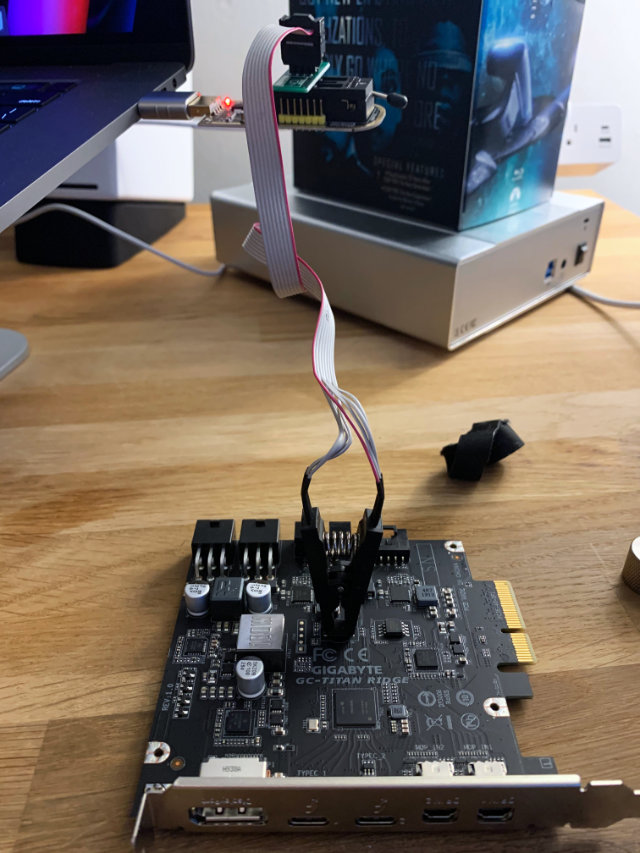
Figure 3: All wired up
With the programmer all plugged in, I pulled down the flashrom tool (brew install flashrom), and downloaded the DM2 firmware (available from the
previously linked MacRumors thread). With the programmer clipped to the blue
chip, I confirmed that everything was working.
tglynn@Neptune ~ $ flashrom -p ch341a_spi
flashrom v1.2 on Darwin 19.4.0 (x86_64)
flashrom is free software, get the source code at https://flashrom.org

Calibrating delay loop... OK.
libusb: info [darwin_claim_interface] no interface found; setting configuration: 1
Found Winbond flash chip "W25Q80.V" (1024 kB, SPI) on ch341a_spi.
No operations were specified.
On second run, that libusb error disappeared (default is set)
tglynn@Neptune ~ $ flashrom -p ch341a_spi
flashrom v1.2 on Darwin 19.4.0 (x86_64)
flashrom is free software, get the source code at https://flashrom.org

Calibrating delay loop... OK.
Found Winbond flash chip "W25Q80.V" (1024 kB, SPI) on ch341a_spi.
No operations were specified.
Then, I backed up the original ROM.
tglynn@Neptune ~/work/thunderbolt3_flash $ pwd
/Users/tglynn/work/thunderbolt3_flash
tglynn@Neptune ~/work/thunderbolt3_flash $ flashrom -p ch341a_spi -r OriginalFirmware-BlueChip.bin
flashrom v1.2 on Darwin 19.4.0 (x86_64)
flashrom is free software, get the source code at https://flashrom.org

Calibrating delay loop... OK.
Found Winbond flash chip "W25Q80.V" (1024 kB, SPI) on ch341a_spi.
Reading flash... done.
tglynn@Neptune ~/work/thunderbolt3_flash $ ls
OriginalFirmware-BlueChip.bin
tglynn@Neptune ~/work/thunderbolt3_flash $ file OriginalFirmware-BlueChip.bin
OriginalFirmware-BlueChip.bin: data
tglynn@Neptune ~/work/thunderbolt3_flash $
Then I moved over to the green chip and repeated the same process to back it up.
tglynn@Neptune ~/work/thunderbolt3_flash $ flashrom -p ch341a_spi -r OriginalFirmware-GreenChip.bin
flashrom v1.2 on Darwin 19.4.0 (x86_64)
flashrom is free software, get the source code at https://flashrom.org

Calibrating delay loop... OK.
Found Winbond flash chip "W25Q80.V" (1024 kB, SPI) on ch341a_spi.
Reading flash... done.
tglynn@Neptune ~/work/thunderbolt3_flash $ ls
OriginalFirmware-BlueChip.bin  OriginalFirmware-GreenChip.bin
tglynn@Neptune ~/work/thunderbolt3_flash $ file OriginalFirmware-GreenChip.bin
OriginalFirmware-GreenChip.bin: data
With both safely backed up, it was time to flash the custom ROM. I switched back to the blue chip yet again.
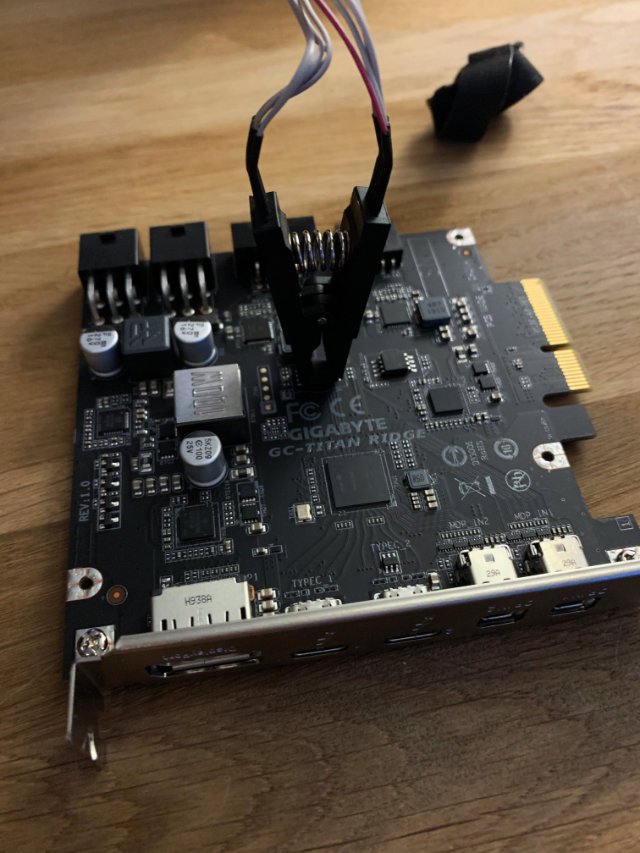
Figure 4: In the orientation described above, the blue chip is on the left
Then I wrote the updated firmware.
tglynn@Neptune ~/work/thunderbolt3_flash $ flashrom -p ch341a_spi -w TitanRidgeNVM23-E64Fr.bin
flashrom v1.2 on Darwin 19.4.0 (x86_64)
flashrom is free software, get the source code at https://flashrom.org

Calibrating delay loop... OK.
Found Winbond flash chip "W25Q80.V" (1024 kB, SPI) on ch341a_spi.
Reading old flash chip contents... done.
Erasing and writing flash chip... Erase/write done.
Verifying flash... VERIFIED.
For good measure, I ran the verify as well (redundant with the previous commands flags, but interesting to see).
tglynn@Neptune ~/work/thunderbolt3_flash $ flashrom -p ch341a_spi -v TitanRidgeNVM23-E64Fr.bin
flashrom v1.2 on Darwin 19.4.0 (x86_64)
flashrom is free software, get the source code at https://flashrom.org

Calibrating delay loop... OK.
Found Winbond flash chip "W25Q80.V" (1024 kB, SPI) on ch341a_spi.
Verifying flash... VERIFIED.
If you were to say, oh I don’t know, not realize the import of the red wire on the USB programmer and clip onto the chip backwards (not that I have any experience with that…) fear not! In my experience, all that will happen is the negotiation will fail, and the flashing capabilities won’t be apparent.
tglynn@Neptune ~/work/thunderbolt3_flash $ flashrom -p ch341a_spi
flashrom v1.2 on Darwin 19.4.0 (x86_64)
flashrom is free software, get the source code at https://flashrom.org

Calibrating delay loop... OK.
libusb: info [darwin_claim_interface] no interface found; setting configuration: 1
Found Generic flash chip "unknown SPI chip (REMS)" (0 kB, SPI) on ch341a_spi.
===
This flash part has status NOT WORKING for operations: PROBE READ ERASE WRITE
The test status of this chip may have been updated in the latest development
version of flashrom. If you are running the latest development version,
please email a report to flashrom@flashrom.org if any of the above operations
work correctly for you with this flash chip. Please include the flashrom log
file for all operations you tested (see the man page for details), and mention
which mainboard or programmer you tested in the subject line.
Thanks for your help!
No operations were specified.
Flipping the programmer back around and correctly lining up the pins should sort that out.
With that, power and firmware were all sorted out.
drivers #
Interestingly enough, you could stop right here and be most of the way done. Once those pins are shorted and the custom firmware put into place, thunderbolt 3 works. It seems that it can only enumerate devices when they’re powered on already, so there is a bit of a silly ritual to get things working. Starting with the machine powered off and the thunderbolt 3 device unplugged, power on the Mac Pro. Once the Mac Pro is powered on, plug in the Thunderbolt 3 device. In my experience, the device would power on (the Caldigit’s blue power indicator came on, and the LG 5k even passed video through, working like a regular monitor), but no ports or devices on the other end of the Thunderbolt device would work (none of the USB ports on the Caldigit worked, and the webcam/brightness controls/speaker/mic and USB ports on the LG 5k did not work). Rebooting would walk one step further in the chain; in my case, the Caldigit would work just fine at that point, with every port functioning. If the LG 5k was connected to the downstream Thunderbolt 3 port of the Caldigit, it would take yet another reboot before the next link in the chain would fill in and the webcam/brightness/usb controls on the LG 5k would all work. Unplugging the Thunderbolt 3 cable would reset this dance, breaking the first link in the chain and forcing me to walk back through all of that.
But that’s less than ideal. And, I’m pleased to tell you, there is a better solution. Enter Open Core, and a custom SSDT. In this field, I think the Hackintosh community has better documentation (see the repository of patched Thunderbolt firmware files, the quick comparative analysis of Thunderbolt DROM and Thunderbolt Config, thunderbolt drom decoded, and the micro-guide for gigabyte gc-titan ridge for much more detail). I recognize that may be my own language limitations (as I understand it, the source of the successful firmware is a German Hackintosh forum, although I’ve seen some disputes around who precisely did the work to hack it together), but in any case, I landed on a fairly simple configuration. A single SSDT, added to the ACPI in Open Core.
<?xml version="1.0" encoding="UTF-8"?>
<!DOCTYPE plist PUBLIC "-//Apple//DTD PLIST 1.0//EN" "http://www.apple.com/DTDs/PropertyList-1.0.dtd">
<plist version="1.0">
<dict>
    <key>ACPI</key>
    <dict>
        <key>Add</key>
        <array>
            <dict>
                <key>Comment</key>
                <string>GC Titan Ridge HotPlug SSDT</string>
                <key>Enabled</key>
                <true/>
                <key>Path</key>
                <string>SSDT-TBOLT3.aml</string>
            </dict>
        </array>
tglynn@jupiter ~/projects/opencore/my_opencore/EFI/OC (master*) $ shasum -a 256 ACPI/SSDT-TBOLT3.aml
54a5f8fc04e723c838deb63052067c380c68e216d693ca23bf61f6683dc60fb9  ACPI/SSDT-TBOLT3.aml
I’m not going to document the whole Open Core setup here - the wiki entry at the start of the MacRumors forum thread has improved by leaps and bounds since I first went through this back in April, and it’s in fantastic shape now. Follow that wiki entry, add in the directive above and pull down the SSDT-TBOLT3.aml file and you should be all set with Thunderbolt 3.
There is one pitfall that snagged me for quite a while. The Titan Ridge card needs to be in slot 4 (as I understand it, it’s hardcoded in to the SSDT). Due to the shared bandwidth of slot 3 and slot 4, if you have another high bandwidth card in slot 3, the Titan Ridge card will not work with the SSDT enabled. In my experience, when I had my Syba I/O card in slot 3 or a USB 3.2 PCIe card in slot 3, the Titan Ridge would work without the SSDT, but would not be recognized or initialized if I attempted to load the custom SSDT. Ultimately, I left slot 3 totally empty and made do with slots 1 (for a graphics card), 2 (for NVMe storage) and slot 4 (for Thunderbolt 3).
I’ve skimmed over a whole slew of testing and troubleshooting - alternative firmwares, spelunking through custom SSDTs with MaciASL, several Open Core versions, but ultimately over the last few months I’ve found the flashed card in slot 4, empty slot 3 and the SSDT linked above in Open Core to be the most reliable and consistent solution.